2 + 24In this tutorial you will set up your first lab, open your first notebook, and start giving Python instructions. Along the way we will use Python as a calculator, make some mistakes on purpose, store values in variables, and work with text and lists. By the end you will have turned the rhyme Twinkle, Twinkle, Little Star into a list of words. Next week in class you will build a language model from the rhyme by hand, and then you will build the same model in Python, starting from that list.
Before you start, you should have worked through 000 Setting up your computer.
You can move quickly through the sections on calculations, variables, types, strings, and lists. Do not skip the lab setup (the folder layout, uv, and the .venv kernel), the part about comments and Run All, or the Your turn questions. Before you run them, predict what these give: words[40:100] and words[44], text.count("twinkle") and words.count("twinkle"), and -7 // 2.
Work in your own notebook, and type the code yourself. The code on these pages cannot be copied with a button, on purpose. Typing makes you read every character, and you learn from the small mistakes you make. (VS Code types some closing brackets and quotation marks for you. If you end up with two, delete one.)
Run each piece of code as you type it, and check that your output matches the output on this page. If it does not, look for a typo first: a missing quotation mark, bracket, or colon, or a space where there should not be one. If you are stuck for more than about ten minutes, ask.
For each tutorial, your notebook should have
You will learn very little from a tutorial if you type the code and run it without thinking about what each line does. Your own notes will also be more useful to you later than a copy of the tutorial.
Answer the questions that come up along the way (What changed? What do you expect?) in your notes, in a sentence or two. The Your turn questions at the end take longer.
Explore, too. Add cells of your own to try variations of the code and to look more closely at what it makes, for example with type and len. Keep the ones that teach you something, with a note saying what you learned.
For the tutorials, you may ask an AI chatbot to explain an idea or an error message, but not to write your code for you. (See the AI use policy.)
Each week’s Python work is a lab, with its own folder inside your CSCI295 folder. The folder holds everything for the lab: your notebooks, the data you start from, anything you make from the data, and a record of the Python packages the lab needs. All of this week’s work goes in a folder called week01_first_steps. You do the steps in this section once, when you start the lab.
Open a terminal in VS Code (Terminal › New Terminal) and make the lab’s folder:
mkdir ~/CSCI295/week01_first_stepsNow open the folder in VS Code. Choose File › Open Folder…, go to your CSCI295 folder, select week01_first_steps, and click Open. (Your CSCI295 folder is in your home folder. In that window, command + shift + H takes you to your home folder on a Mac. On Windows, type %USERPROFILE% in the bar at the top of the window and hit enter.)
If VS Code asks whether you trust the authors of the files in this folder, click Yes, I trust the authors. (You are the author.) If instead a bar across the top of the window says Restricted Mode, click Manage in that bar and then Trust. Notebooks will not run in Restricted Mode.
VS Code now treats this folder as your workspace. Its name appears at the top of the Explorer panel on the left. Always open the lab’s folder itself, not the whole CSCI295 folder. The terminal starts in the folder you open, and VS Code looks there for the lab’s Python.
Open a new terminal (Terminal › New Terminal). It starts in your lab folder, and the prompt includes the folder’s name. (If week01_first_steps is not in the prompt, you opened the wrong folder.) Run
uv init --bare --python 3.14 --pin-pythonThe options tell uv to skip files we do not need (--bare), to use Python 3.14, and to record that choice (--pin-python). This makes two small files. pyproject.toml describes the lab, including which packages it needs (none yet). .python-version records that the lab uses Python 3.14. uv manages both files, so you will not need to edit them. (uv calls a folder set up like this a project, which is where the name pyproject.toml comes from.)
Now add the first package. A notebook sends your code to a kernel, a Python program that runs behind the scenes. The kernel runs your code and remembers the results. ipykernel is the package that lets this lab’s own Python be that kernel.
uv add ipykerneluv creates a folder called .venv (short for virtual environment) that holds this lab’s own copy of Python and its packages, installs ipykernel and the packages it depends on, and writes a file called uv.lock that records the exact version of every package. It prints a long list of packages. If VS Code notices the new environment and asks whether you want to select it for the workspace folder, click Yes.
Packages belong to a lab. We add them to each lab with uv add, which keeps labs from interfering with each other and makes the lab’s pyproject.toml and uv.lock files a complete record of what the lab needs.
In R you may have installed a package once and used it everywhere. Here uv add plays the role of install.packages(), but for one lab only. The import statement, which you will meet later in this tutorial, plays the role of library().
Every lab folder in this course is organized the same way:
| Folder | What goes in it |
|---|---|
| notebooks | your notebooks (files ending in .ipynb) |
| data/raw | data you start from. Never edit these files. |
| data/processed | data you make from the raw data with code |
| outputs | figures and tables you make, for example to hand in |
Make the folders from the terminal:
mkdir -p notebooks data/raw data/processed outputsNew-Item -ItemType Directory notebooks, data/raw, data/processed, outputs(New-Item is PowerShell’s command for making new files and folders. It prints a short table for each folder it makes.)
Look at the Explorer panel. You should see the four folders (data has two folders inside it), along with pyproject.toml, uv.lock, .python-version, and .venv. Click the arrows next to the folder names to open and close them.
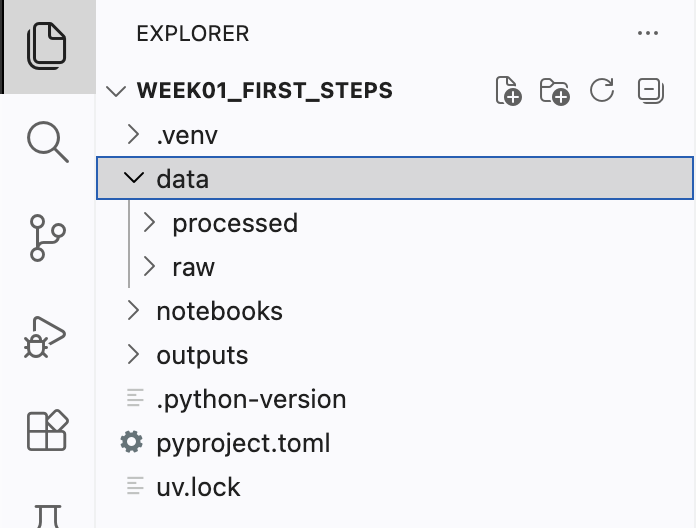
Our first raw data will be the two verses of The Star by Jane Taylor (1806), better known as Twinkle, Twinkle, Little Star. We will use the same rhyme in class next week. In the Explorer panel, right click the raw folder (inside data), choose New File…, type the name the_star.txt, and hit return. An empty file opens. Type or paste in the rhyme exactly as it appears here, then save the file (command + S on a Mac, Ctrl + S on Windows).
Twinkle, twinkle, little star,
How I wonder what you are!
Up above the world so high,
Like a diamond in the sky.

When the blazing sun is gone,
When he nothing shines upon,
Then you show your little light,
Twinkle, twinkle, all the night.A notebook is a document made of cells. A code cell holds Python code, and when you run it, the result appears right below it. A Markdown cell holds your notes, written in Markdown, a simple way to format text. Notebooks let you keep your code, its results, and your explanations together in one place, and they are one of the most common ways scientists work with data in Python.
Make a notebook for this tutorial. In the Explorer, right click the notebooks folder, choose New File…, type the name first_steps.ipynb, and hit return. The .ipynb ending tells VS Code it is a notebook, and it opens in the notebook editor.
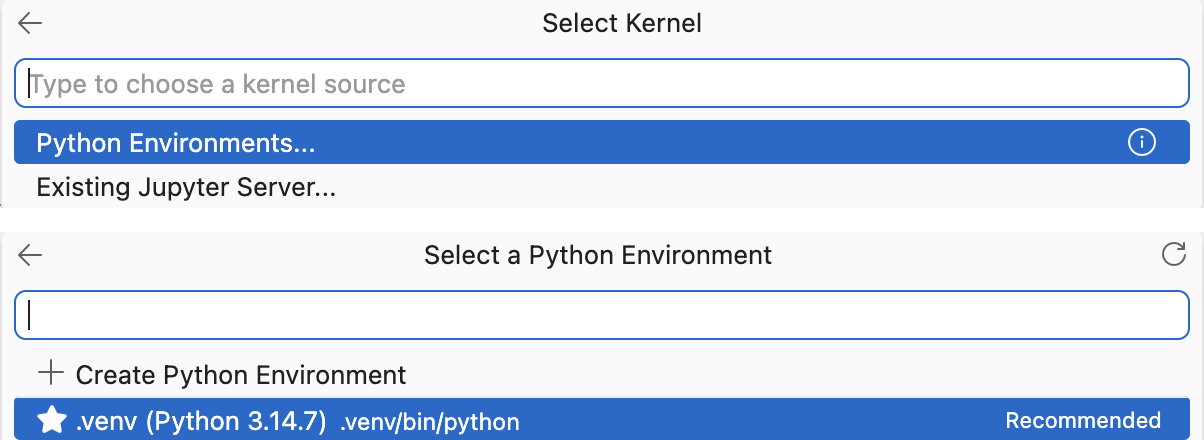
Before the notebook can run code, you need to tell it which Python to use. Click Select Kernel in the upper right corner of the notebook, choose Python Environments…, and pick the lab’s own Python, which VS Code calls .venv or week01-first-steps and usually marks Recommended. Its path is .venv/bin/python (.venv\Scripts\python.exe on Windows). If VS Code recommends Create Python Environment instead, do not choose it. Ignore any other copies of Python in the list.
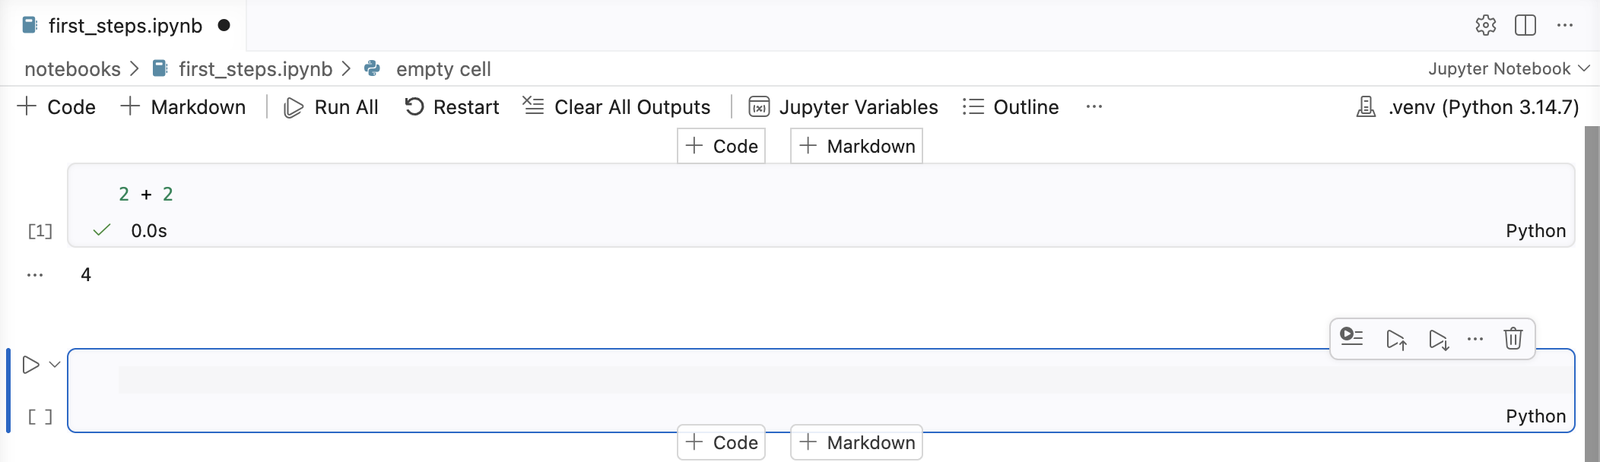
A new notebook has no cells. Click + Code at the top of the notebook to add a code cell, type 2 + 2 in it, and run the cell by pressing shift + return (shift + enter on Windows), or by clicking the triangle to the left of the cell. The first time you run a cell it may take a few seconds, because the kernel has to start.
2 + 24You have run your first Python code! Shift + return also moves you to the next cell, and at the end of the notebook it adds a new one.
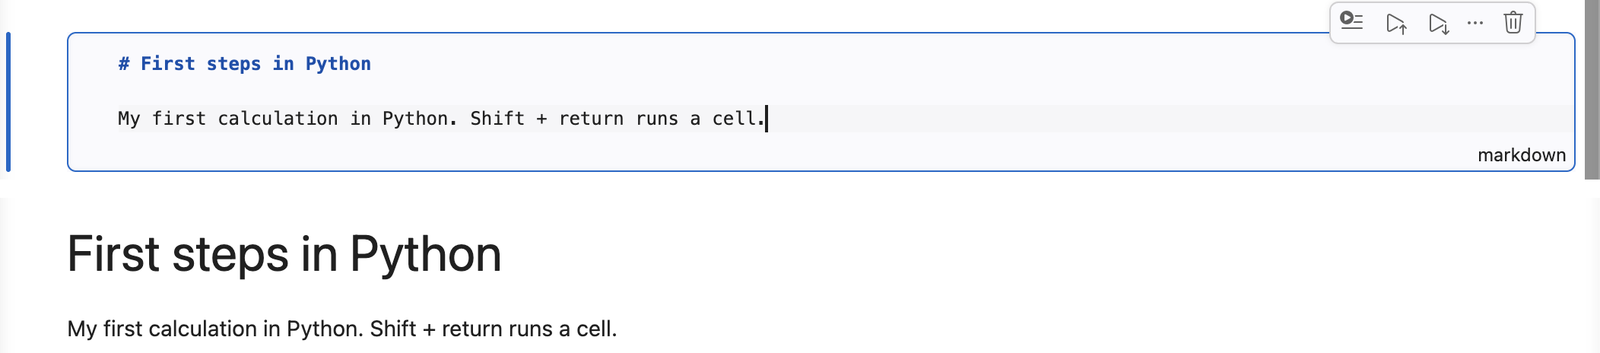
Hover your mouse between two cells or below the last one, and click + Markdown. Type a heading and a sentence, for example
# First steps in Python

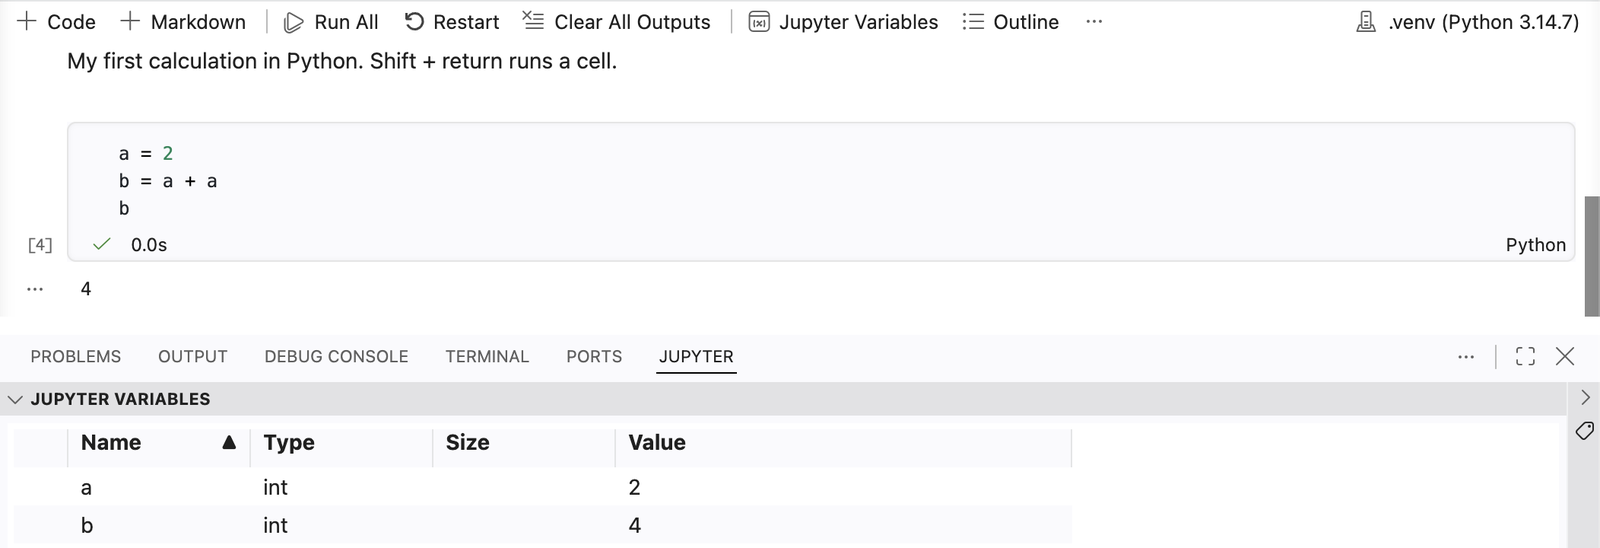
My first calculation in Python. Shift + return runs a cell.
Run the Markdown cell the same way you run a code cell (shift + return) and it turns into formatted text. Double click it to edit it again. Use Markdown cells throughout your notebook to explain what you are doing and what you notice. The Markdown guide has more of what you can do.
The label in the lower right corner of a cell tells you what kind it is: Python for a code cell, markdown for a Markdown cell. Keep an eye on it. When you run the last cell of a notebook, the new cell VS Code adds is the same kind as the one you ran, so after a Markdown cell you get another Markdown cell. If you want a code cell there instead, delete the empty cell (the trash can icon in its toolbar) and click + Code.
When you come back to the lab after closing VS Code, you do not repeat the setup. Instead:
Try a few more calculations, each in its own cell.
7 / 23.57 // 232 ** 101024(2 + 3) * 420The first one is ordinary division. The second, //, divides and rounds down to a whole number. The third, **, means “to the power of”, so this is \(2^{10}\). Parentheses work the way they do in math.
Now try the way many of us are used to writing powers:
2 ^ 108There is no error, but the answer is not 1024. In Python, ^ is a different operation (on binary digits, which we will not use). Code that runs without an error message can still be wrong. When you can, check results against what you expect.
What happens if we give Python an incomplete command? Try 2 +.
2 +Cell In[7], line 1 2 + ^ SyntaxError: invalid syntax
Python prints an error message. Error messages can look intimidating, but they tell you what went wrong. Start with the last line. It names the kind of error (here a SyntaxError, meaning Python could not make sense of the code) and gives a short description. The caret, ^, points to where Python found the problem.
What if we ask for something Python does not know about? Try 2 + two.
2 + two--------------------------------------------------------------------------- NameError Traceback (most recent call last) Cell In[8], line 1 ----> 1 2 + two NameError: name 'two' is not defined
This time it is a NameError: Python does not know anything called two. You will see a lot of error messages this semester. Read them from the bottom up, and they usually tell you where to look.
You will run whole notebooks from top to bottom with Run All, and Run All stops at the first error. So once you have read an error message and understand it, turn the code that caused it into a comment by typing # at the start of the line:
# 2 + twoPython ignores everything on a line after a #. The line stays in your notebook as a record of what you tried, but it no longer stops the notebook. Do this with each error we make on purpose in these tutorials. Comments are also handy for short notes to yourself about your code.
It gets tedious to type the same values over and over. A variable is a name that refers to a value, so we can use the name instead. Let’s use a to refer to the number 2.
a = 2You should notice two things. First, Python does not print anything. The value 2 is stored under the name a. Second, the = sign does not mean “equals” the way it does in math. Read a = 2 as “let a be 2” or “store 2 in a”.
Python has no <-. If you type a <- 2, Python reads it as “is a less than -2?” and answers True or False (or gives a NameError if there is no a yet), without storing anything.
To see the value of a variable, put its name on the last line of a cell. (VS Code may pop up suggestions as you type. Keep typing, or press escape to close the list. Return picks the highlighted suggestion.)
a2Of course, the real advantage is that we can use a in calculations,
a + a4and store the result in another variable.
b = a + a
b4VS Code can show you all of the variables you have defined. Click Jupyter Variables in the toolbar at the top of the notebook. (If the window is narrow, it is under the three dots, …, at the right end of the toolbar.) A panel opens at the bottom of the window with the name, type, and value of each variable. Run a cell that changes a variable, for example a = 10, and watch the panel. What changed? Did b change?
A few rules and habits for names:
The kernel keeps track of what you have run, not of what you see on the screen. It keeps every variable from every cell you have run, in the order you ran them. If you change a cell near the top and do not run it again, the variables do not change. If you close VS Code, the kernel forgets everything, and you need to run your cells again. To make sure your notebook works from top to bottom, click Restart in the notebook toolbar (VS Code asks whether you are sure, so click Restart again) and then Run All. Do this before you hand in a notebook.
Every value in Python has a type. We have been using whole numbers, which Python calls integers (int). Numbers with a decimal point are floats, short for floating point numbers. Text is a string (str), written inside quotation marks. To find the type of a value, use type. It is a function: a named command that takes something in parentheses and gives back a result, like SUM in a spreadsheet.
type(2)inttype(2.5)floattype("twinkle")strA comparison has a type too. Two equal signs, ==, ask whether two things are equal, and the answer is either True or False, which Python calls a Boolean (bool).
2 + 2 == 4Truetype(2 + 2 == 4)boolTypes matter because Python treats different kinds of values differently. What do you expect to happen here?
"2" + 2--------------------------------------------------------------------------- TypeError Traceback (most recent call last) Cell In[18], line 1 ----> 1 "2" + 2 TypeError: can only concatenate str (not "int") to str
Python will not add a string and a number. A TypeError means we asked Python to do something with a kind of value that does not support it. We can turn the string into a number with the int function first:
int("2") + 24Strings hold text. You can use single or double quotes, as long as they match.
opening = "Twinkle, twinkle, little star"
opening
'Twinkle, twinkle, little star'The len function tells us the length of a string, which is the number of characters in it, including spaces and punctuation.
len(opening)29Strings come with their own functions, called methods, that you use with a dot after the string. (This is why dots do not go in names.) For example, lower makes a copy of the string with every letter in lower case.
opening.lower()'twinkle, twinkle, little star'Notice the parentheses at the end. They tell Python to run the method. Other string methods include upper, replace, and split.
The + sign joins strings together:
opening + ", how I wonder what you are!"'Twinkle, twinkle, little star, how I wonder what you are!'An f-string (the f is for formatted) puts values into a string. Put an f before the opening quote, and put the names of variables (or any calculation) inside curly braces:
characters = len(opening)
f"The first line has {characters} characters."
'The first line has 29 characters.'Now let’s read the rhyme from the file you saved. Python finds files using paths, which say where a file is. A path is a set of directions from one folder to another. Your notebook runs from the notebooks folder, and the rhyme is in data/raw, so the path from the notebook to the rhyme goes up one folder, out of notebooks and into the lab’s folder (that is what .. means), then into data, then into raw (Figure 6). A / separates the steps.
We will describe that path with a tool called Path. It is not built into Python the way len is, so we need to import it first, from a module called pathlib. A module is a collection of related tools, and pathlib comes with Python, so there is nothing to install.
from pathlib import Path

DATA_RAW = Path("../data/raw")
The name DATA_RAW is in capital letters because it is a setting that stays the same for the whole notebook, and Python programmers use capitals for names like that.
Now read the rhyme into a string:
text = (DATA_RAW / "the_star.txt").read_text(encoding="utf-8")
text
'Twinkle, twinkle, little star,\nHow I wonder what you are!\nUp above the world so high,\nLike a diamond in the sky.\n\nWhen the blazing sun is gone,\nWhen he nothing shines upon,\nThen you show your little light,\nTwinkle, twinkle, all the night.\n'In the first line, DATA_RAW / "the_star.txt" adds the file’s name to the path, with a / between them as in Figure 6. Then read_text reads the whole file into a string, and we call the string text. The option encoding="utf-8" tells Python how the characters in the file are stored. Always include it. Without it, Windows laptops assume an older way of storing characters, and curly quotation marks or accented letters come out garbled or stop the reading with an error.
If you get a FileNotFoundError instead of the rhyme, Python could not find the file. Check that the file is named exactly the_star.txt, that it is in data/raw, and that your notebook is in the notebooks folder.
Each \n in the rhyme is a newline character, the invisible character that marks the end of a line. The print function shows the string the way it would look on a page:
print(text)Twinkle, twinkle, little star,
How I wonder what you are!
Up above the world so high,
Like a diamond in the sky.
When the blazing sun is gone,
When he nothing shines upon,
Then you show your little light,
Twinkle, twinkle, all the night.
Now we can split the rhyme into words. The split method breaks a string into pieces wherever there is a space or a line break.
words = text.lower().split()
words
['twinkle,',
'twinkle,',
'little',
'star,',
'how',
'i',
'wonder',
'what',
'you',
'are!',
'up',
'above',
'the',
'world',
'so',
'high,',
'like',
'a',
'diamond',
'in',
'the',
'sky.',
'when',
'the',
'blazing',
'sun',
'is',
'gone,',
'when',
'he',
'nothing',
'shines',
'upon,',
'then',
'you',
'show',
'your',
'little',
'light,',
'twinkle,',
'twinkle,',
'all',
'the',
'night.']We did two things in one line. First text.lower() made a lower-case copy of the rhyme, and then .split() split that copy into words. The result is a list, an ordered collection of values written inside square brackets and separated by commas. Here every value in the list is a string. (Splitting a text into words is also where researchers start when they analyze interviews or the answers to open-ended survey questions.)
How many words are there?
len(words)44We can pick out an item from a list by its position, which Python calls its index. Python counts from 0, so the first word is at index 0.
words[0]'twinkle,'words[1]'twinkle,'Negative indexes count from the end. words[-1] is the last word.
words[-1]'night.'We can pick out several items at once with a slice. The slice words[0:4] starts at index 0 and stops before index 4, so it gives us the first four words: indexes 0, 1, 2, and 3.
words[0:4]['twinkle,', 'twinkle,', 'little', 'star,']Slices always stop just before the second number. That feels strange at first, but it has a nice property: words[0:4] and words[4:8] fit together without overlapping or leaving a gap.
words[4:8]['how', 'i', 'wonder', 'what']Three habits from R give wrong answers here without an error message. R counts from 1, but Python counts from 0. In R, x[-1] drops the first item, but in Python words[-1] is the last word. And R’s 1:4 includes 4, but Python’s words[1:4] stops before index 4.
Lists have methods too. The count method counts how many times a value appears in a list. “Twinkle” appears four times in the rhyme, so let’s check:
words.count("twinkle")0The count is zero. Look again at words[0] above. The first word is 'twinkle,', with a comma attached, because split only splits at spaces and line breaks. To Python, 'twinkle,' and 'twinkle' are different strings, and the list does not contain a single 'twinkle' without a comma. Next week we will write a loop that cleans the punctuation off every word, and then we will count again.
What happens if we add a number to a list? Try it.
[1, 2, 3] + 2--------------------------------------------------------------------------- TypeError Traceback (most recent call last) Cell In[36], line 1 ----> 1 [1, 2, 3] + 2 TypeError: can only concatenate list (not "int") to list
Python will not add 2 to a list. And adding two lists joins them together, instead of adding them item by item:
[1, 2, 3] + [10, 20, 30][1, 2, 3, 10, 20, 30]To do something to every item in a list, we will use a loop (next week). For columns of data, a package called pandas does arithmetic on every value at once (week 3).
A Python list is not an R vector. Arithmetic on an R vector happens to every item, but arithmetic on a list does not.
The help function shows the documentation for a function or method:
help(len)Help on built-in function len in module builtins:
len(obj, /)
Return the number of items in a container.
In a notebook you can also put a question mark after a name, as in len? or words.count?, and run the cell. In VS Code, hovering the mouse over a name in your code often shows the same information. When an error message puzzles you, searching the web for its last line is a good first step, and the official Python tutorial is a good place to read more about anything we do here.
Do these in your notebook, below the tutorial code. Put a short Markdown cell before each one saying which question it answers.
seconds_per_minute = 60 and build up from there, so that someone reading your code can tell what each number means.help(str.splitlines) to find out what it does. Is the blank line between the verses counted?words.index("when")). Use it and a slice to make a list called second_verse that holds the words of the second verse. (Check: second_verse has 22 words.)words.count("little"). Why does this one work when words.count("twinkle") did not?words[44]"night." == "night"When you are finished, click Restart and then Run All in the notebook toolbar, and check that every cell runs. If Run All stops at one of the errors we made on purpose, turn that line into a comment, as described in Error messages, and try again. Then read through the notebook and check the results. Running the cells in order can change a result you got earlier, so make sure the outputs still match the tutorial and what your notes and answers say. Save the notebook. This is the only Python tutorial you will hand in on Moodle, and starting in week 2 you will hand in your work through GitHub. To find the notebook on your laptop, right click first_steps.ipynb in the Explorer and choose Reveal in Finder (Reveal in File Explorer on Windows). Then upload first_steps.ipynb to Moodle by the week 1 deadline on the schedule.